Tuesday, February 19, 2008

Installation

Finally I was able to overcome all impediments (like permissions, sluggish lab assistants and viruses on machines) and installed some software related to Sun Microsystems technologies on 15 machines (3 machines had to be left out for they had only 128 Mbs of Ram) in CS lab 211.

The following software was installed:
jdk 1.6.0
netbeans 6.0
open office 2.3

Souvik has already installed these software along with solaris 10 on all systems in another lab CS 209 (around 20 machines). I am planning to install these software in two more labs. Then we will have these software on all labs on the first floor.

Sunday, February 10, 2008

Running your First Java Program using Netbeans 6.0

Well if you have been following my blogs, then this one is third in the series. I was highly motivated to write this blog when a couple of first years told me that my previous blogs had enabled them to get started with the Java programming language and they egged me to show them the way to get started with the Netbeans IDE. While in the previous two blogs I showed how to run a simple Java program and then go about debugging them (using the windows notepad as the editor and the command prompt), this one will introduce you to the Netbeans IDE.

In computing, an integrated development environment (IDE) is a software application that provides comprehensive facilities to computer programmers for software development. An IDE normally consists of a source code editor, a compiler and/or interpreter, build automation tools, and (usually) a debugger.Typically an IDE is dedicated to a specific programming language, so as to provide a feature set which most closely matches the programming paradigms of the language. However, some multiple-language IDEs are in use, such as Eclipse, ActiveState Komodo, SlickEdit and recent versions of Microsoft Visual Studio.

NetBeans began in 1997 as Xelfi, a student project under the guidance of the Faculty of Mathematics and Physics at Charles University in Prague. A company was later formed around the project and produced commercial versions of the NetBeans IDE until it was bought by Sun Microsystems in 1999. Sun open-sourced the NetBeans IDE in June of the following year. The NetBeans community has since continued to grow, thanks to individuals and companies using and contributing to the project.

The NetBeans IDE is an open-source integrated development environment written entirely in Java using the NetBeans Platform. NetBeans IDE supports development of all Java application types (J2SE, web, EJB and mobile applications) out of the box. The current version is NetBeans IDE 6.0, which was released in December 2007.

I have tried to provide a very simple and quick introduction to the NetBeans IDE workflow by walking you through the creation of a simple "Hello World" Java program. Once you go through the same, you will have a general knowledge of how to create, build, and run applications in the IDE.

CHECKLIST

To write your first program, you'll need to have the following software installed on your system:

  • The J2SE Development Kit (JDK).
  • NetBeans IDE 6.0.

To create an IDE project follow these simple steps. I have tried to include as many screen shots to make the things as clear as possible.

  1. Start NetBeans IDE.
  2. In the IDE, choose File > New Project, as shown in the figure below.

  3. In the New Project wizard, expand the Java category and select Java Application as shown in the figure below. Then click Next.

    NetBeans IDE, New Project wizard, Choose Project page.

  4. In the Name and Location page of the wizard, do the following (as shown in the figure below):
    • In the Project Name field, type HelloWorldApp.
    • In the Create Main Class field, type helloworldapp.HelloWorldApp.
    • Leave the Set as Main Project checkbox selected.

    NetBeans IDE, New Project wizard, Name and Location page.

  5. Click Finish.

The project is created and opened in the IDE. You should see the following components:

  • The Projects window, which contains a tree view of the components of the project, including source files, libraries that your code depends on, and so on.
  • The Source Editor window with a file called HelloWorldApp open.
  • The Navigator window, which you can use to quickly navigate between elements within the selected class.

NetBeans IDE with the HelloWorldApp project open.

Because we left the Create Main Class checkbox selected in the New Project wizard, the IDE has created a skeleton class for us. You can add the "Hello World!" message to the skeleton code by replacing the line:

            // TODO code application logic here
with the line:
            System.out.println("Hello World!");

Save the change by choosing File > Save.

The file should look something like this:

/*
* HelloWorldApp.java
*
* Created on Feb 28, 2008, 7:56:01 PM
*
* To change this template, choose Tools | Templates
* and open the template in the editor.
*/

package helloworldapp;

/**
*
* @author Rahul Mathur
*/
public class HelloWorldApp {

/**
* @param args the command line arguments
*/
public static void main(String[] args) {
System.out.println("Hello World!");
}

}

COMPILING THE SOURCE FILE

To compile your source file, choose Build > Build Main Project from the IDE's main menu.

You can view the output of the build process by choosing Window > Output > Output.

The Output window opens and displays output similar to what you see in the following figure.

Output window showing results of building the HelloWorld project.

If the build output concludes with the statement BUILD SUCCESSFUL, congratulations! You have successfully compiled your program!

If the build output concludes with the statement BUILD FAILED, you probably have a syntax error in your code. Errors are reported in the Output window as hyper-linked text. Click such a hyper-link to navigate to the source of an error. You can then fix the error and once again choose Build > Build Main Project.

When you build the project, the bytecode file HelloWorldApp.class is generated. You can see where the new file is generated by opening the Files window and expanding the Hello World App/build/classes/helloworldapp node as shown in the following figure.

Files window, showing the generated .class file.

Now that you have built the project, you can run your program.

RUNNING THE SOURCE FILE

From the IDE's menu bar, choose Run > Run Main Project.

The next figure shows what you should now see.

The program prints Hello World! to the Output window (along with other output from the build script).

Congratulations! This is all that one needs to get started.

Common Problems in running and compiling a Java Program (and their Solutions)

1. Compiler Errors

'javac' is not recognized as an internal or external command, operable program or batch file


This is the most common of all the errors faced by people trying to compile their first piece of code. This message means that Windows cannot find the compiler (javac).

Here's one way to tell Windows where to find javac. At the prompt type the following command and press Enter:

C:> "\Program Files\Java\jdk1.6.0_\bin\javac HelloWorldApp.java

If you choose this option, you'll have to precede your javac and java commands with C:> "\Program Files\Java\jdk1.6.0_\bin\ each time you compile or run a program. To avoid this extra typing and to be able to conveniently run the JDK executables (javac.exe, java.exe, javadoc.exe, etc.) from any directory without having to type the full path of the command, you should update the PATH variable.

To set the PATH permanently, add the full path of the jdk1.6.0_\bin directory to the PATH variable. Typically this full path looks something like C:\Program Files\Java\jdk1.6.0_\bin. Set the PATH as follows on Microsoft Windows:

1. Click Start > Control Panel > System on Windows XP or Start> Settings > Control Panel > System on Windows 2000.

2. Click Advanced > Environment Variables.

3. Add the location of bin folder of JDK installation for PATH in User Variables and System Variables. A typical value for PATH is:

C:\Program Files\Java\jdk1.6.0_\bin

The PATH environment variable is a series of directories separated by semi-colons (;) and is not case sensitive. Microsoft Windows looks for programs in the PATH directories in order, from left to right. You should only have one bin directory for a JDK in the path at a time. Those following the first instance are ignored. If one is already present, update it to jdk1.6.0_\bin. If you are not sure where to add the path, add it to the right end of the PATH in the User Variables. The new path takes effect in each new command window you open after setting the PATH variable.

2. Syntax Errors

If you mistype part of a program, the compiler may issue a syntax error. The message usually displays the type of the error, the line number where the error was detected, the code on that line, and the position of the error within the code. Here's an error caused by omitting a semicolon (;) at the end of a statement:

testing.java:14: `;' expected.
System.out.println("Input has " + count + " chars.")
^
1 error

Without the semicolon, the compiler has no way of knowing that the statement is complete.

If you see any compiler errors, then your program did not successfully compile, and the compiler did not create a .class file. Carefully verify the program, fix any errors that you detect, and try again.

3. Semantic Errors

In addition to verifying that your program is syntactically correct, the compiler checks for other basic correctness. For example, the compiler warns you each time you use a variable that has not been initialized:

testing.java:13: Variable count may not have been initialized.
count++
^

Again, your program did not successfully compile, and the compiler did not create a .class file. Fix the error and try again.

4. Runtime Errors

Exception in thread "main" java.lang.NoClassDefFoundError: HelloWorldApp

If you receive this error, java cannot find your bytecode file, HelloWorldApp.class. One of the places java tries to find your .class file is your current directory. So if your .class file is in C:\uiet, you should change your current directory to that. To change your directory, type the following command at the prompt and press Enter:

cd C:\uiet

The prompt should change to C:\uiet>. If you enter dir at the prompt, you should see your .java and .class files. Now enter java HelloWorldApp again.


Exception in thread "main" java.lang.NoClassDefFoundError: HelloWorldApp/class

A common mistake made by beginner programmers is to try and run the java launcher on the .class file that was created by the compiler. For example, you'll get this error if you try to run your program with java HelloWorldApp.class instead of java HelloWorldApp. Remember, the argument is the name of the class that you want to use, not the filename.


Exception in thread "main" java.lang.NoSuchMethodError: main

The Java VM requires that the class you execute with it have a main method at which to begin execution of your application.

I hope all the errors that have been bugging you fall in one of the above categories. Still, if you are confronted with an error that is not listed above do write to me.

Run your First Java Program

One thing I have realized after delivering a couple of sessions on Java that not everyone is very clear about installing the JDK and start programming in Java on their computers (specially the first years). Although there are many tutorials and a lot of help on the internet but its all scattered about making the life tough for a beginner. So my aim is to enable all those who are new to the Java programming environment to get started quickly.

Before you write your first program, you'll need:

  • A text editor (I'll be using a simple editor included with the Windows platforms, the Notepad)

The first program, HelloWorldApp, will simply display the greeting "Hello world!". To create this program, you will:

  1. Create a source file containing the code, written in the Java programming language, that you and other programmers can understand. You can use any other text editor to create and edit source files.
  2. Compile the source file into a .class file. The Java programming language compiler (javac) takes your source file and translates its text into instructions that the Java virtual machine can understand. The instructions contained within this file are known as bytecodes.
  3. Run the program. The Java application launcher tool (java) uses the Java virtual machine to run your application.

1. Create a Source File

First, start your editor. You can launch the Notepad editor from the Start menu by selecting
Programs > Accessories > Notepad.

In a new document, type in the following code:

/**
* The HelloWorldApp class implements an application that
* simply prints "Hello World!" to standard output.
*/
class HelloWorldApp {
public static void main(String[] args) {
System.out.println("Hello World!"); // Display the string.
}
}

Take care when you type. Type all code, commands, and file names exactly as shown. Both the compiler (javac) and launcher tool (java) are case-sensitive, so you must capitalize consistently.

Save the code in a file with the name HelloWorldApp.java. To do this in Notepad, first choose the File > Save As menu item. Then, in the Save As dialog box, specify the folder (directory) where you'll save your file. In the File name text field, type "HelloWorldApp.java", including the quotation marks. From the Save as type combo box, choose Text Documents (*.txt). In the Encoding combo box, leave the encoding as ANSI. When you're finished, the dialog box should look somewhat like this.


Now click Save, and exit Notepad.


2. Compile the Source File into a .class File

Bring up a shell, or "command," window. You can do this from the Start menu by choosing Command Prompt, or by choosing Run and then entering cmd.

A shell window should look something like this.


The prompt shows your current directory (as shown in the preceding figure).

To compile your source file, change your current directory to the directory where your file is located. For example, if your source directory is uiet on the C drive, type the following command at the prompt and press Enter:

cd C:\uiet

Now the prompt should change to C:\uiet>.

If you enter dir at the prompt, you should see your source file, as the following figure shows.
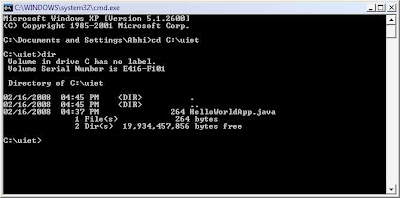

Now you are ready to compile. At the prompt, type the following command and press Enter.

javac HelloWorldApp.java

The compiler will generate a bytecode file, HelloWorldApp.class. At the prompt, type dir to see the new file that was generated, as shown in the following figure.


Now that you have a .class file, you can run your program.

3. Run the Program

In the same directory, enter the following command at the prompt:

java HelloWorldApp

The next figure shows what you should now see:


The program prints "Hello World!" to the screen. Congratulations! Your program works!

Hopefully this post will help you to shed all your inhibitions and you will realize how simple it is realy to start programming in java. Best of Luck!

 
Page Views: